THE NEEDLEBAR
Manuals Section
Part Three
INSTRUCTIONS FOR USING
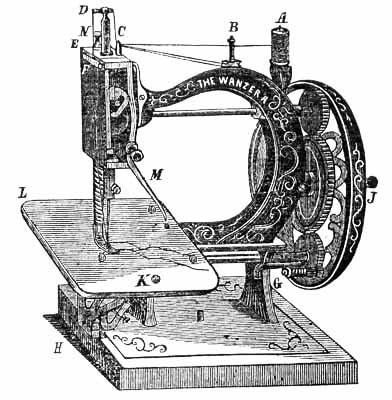
THE WANZER A
FAMILY SEWING MACHINE,
BY HAND OR FOOT.
_____________
SETTING THE NEEDLE
Set the Needle with its head or shank in the Needle Bar D, with its Eye ranging from left to right, with long groove to the left; secure it by the screw in lower end of Needle Bar; set the Needle so that in its descent it will pass through the centre of the Needle Hole, and pass as close as possible to the left of the point of the Shuttle without touching it. Turn the Balance Wheel from you so that the mark on front of Needle Bar D will be even with top of arm, then the eye of Needle, if properly set, should be on a level with the Cloth Plate K.
THREADING THE NEEDLE
The operator must observe particularly in what manner the Needle is threaded. The following is a description of the proper method: - Place the Spool upon the Spindle A, then pass it through the Eyelet C, from left to right, then back around Tension Post B, between Tension Plates, then through the Eyelet C, and up through tube in the Needle Bar, then down between the small flat spring and head of Machine, and through Needle from left to right, leaving three inches of thread.
SPOOLING THE LOWER THREAD
Wind the Lower Thread upon the metallic Bobbin by placing it upon the Spooler, and work the Machine as when sewing. While spooling raise the cloth presser, the Spooler must be oiled, as well as the back point of the Little Shuttle Spool, or Bobbin, when it is being filled; and when it is in the Shuttle both points must be oiled; the Spooler will be found beside the lower small gear; place the Bobbin into the Spooler by springing the spindle with the small gear to the right until sufficient space is opened to admit the Bobbin. The cogs of both gears working together by turning the balance wheel from you the same as when sewing. In winding the Bobbins, or small Shuttle Spools, care should be taken to lay the thread on even and tight.
THREADING THE SHUTTLE
In working, the Shuttle Bobbin revolves inside of Shuttle; the operator must therefore be careful to place the Bobbin in the Shuttle properly. On the inside of Shuttle, at the front or forward end, is a "centre", acted upon by a spring, into this one point of the Bobbin should be placed, with the thread drawing off from the lower side, then press the other point in notch at heel of Shuttle, pushing it down gently until a little snap is heard, or until it enters the small hole or bearing. The thread must then be passed out through the one hole under the wire inside of Shuttle, then in through hole nearest point of Shuttle. Should a greater tension be required, bread through five instead of three holes, being careful always to pass the thread out through the lower hole last, leaving two inches of thread.
Place the Shuttle into the Shuttle Carrier, by springing towards you the Spring Clamp, or holder, then turning it to the right until sufficient space is open to admit it; then spring it back till a click is heard, which secures the Shuttle in its place.
THE TENSION
Care must be taken in regulating the Tension of the lower and upper threads; produce tension enough upon the upper thread to draw the lower loop or lock into the fabric, by turning the Nut on the Tension Post B. If turned too much the thread will break or the seam be puckered; if not sufficient, the loop or lock will not be drawn up into the fabric, but will lie in a succession of loops on the other side. To increase the Tension, turn the Nut towards you; to lessen it, turn the Nut from you. The tension of the under thread is regulated by passing it through a greater or less number of holes in the Shuttle; by the former it is increased, by the latter decreased.
TO REGULATE THE STITCH
The Machine feeds the cloth through itself, the operator guides it; to make a long stitch, draw the short lever under the right hand corner of Cloth Plate towards you; to make a short stitch press it from you.
TO SEW BY HAND
Place the Machine upon a common table or stand. Be seated before the Machine, rise the cloth presser and place the cloth beneath it. Let the cloth presser drop upon the goods to be sewed. Start the Machine by turning the Balance Wheel from you with the hand; never turn it backwards.
TO SEW WITH THE STAND
Be seated before the Machine, place one or both feet upon the Sandals; start the Machine by raising or depressing the toes; or turn the Balance Wheel from you with the hand, to assist; never turn backwards; raise the Needle Bar by turning the wheel, also raise the Cloth Presser and place the cloth beneath it. Let the Cloth Presser drop upon the goods to be sewed.
GENERAL INSTRUCTIONS
With a machine it is not necessary to use as coarse cottons or silk as for hand sewing; two threads being used instead of one. As a general rule, the size of the thread should be taken to make the proper adaptation of needles. Attention to the following Tables will save much trouble and aid in the production of neat work: -
|
Sizes of NEEDLES
|
Cotton Thread
|
KINDS OF WORK
|
|
00 0 1 |
200 to 150 100 to 80 70 to 60 |
Finest Muslins, Linens, Handkerchief, Baby Linen, Shirt
Fronts and Collars.
|
|
2
|
40 to 50
|
Dressmaking, Quilting, &c.
|
|
3
|
16 to 36
|
Woollen Goods
|
|
Sizes of NEEDLES
|
Linen Thread
|
KINDS OF WORK
|
|
2
|
70 to 100
|
Fine Woollen Goods
|
|
3
|
40 to 70
|
Medium Woollen Goods
|
|
4
|
24 to 40
|
Heavy Woollen Goods
|
|
Sizes of NEEDLES
|
Silk Thread
|
KINDS OF WORK
|
|
0 to 1
|
Finest Sizes
|
Silk and Satin
|
|
1 to 3
|
Medium
|
Silk and Mantle Cloths
|