|
GEBRAUCHSANWEISUNG FÜR
DIE ELEKTRISCHE KOFFERNÄHMASCHINE FREIA Teil Zwei |
Mewa Freia Instruction Manual Part Two |
| INHALT |
Seite
|
CONTENTS |
Page
|
|
| Auskoffern |
1
|
Removing from Case |
1
|
|
| Aufbau zur Freiarmmaschine |
2
|
Setting up the Freearm |
2
|
|
| Umwandlung zur Tischmashine |
3
|
Converting to Table Machine |
3
|
|
| Der elektrische Anschluß |
4
|
Electrical Connection |
4
|
|
| Umschaltung der Gerätespannung |
5
|
Switching the Electricals |
5
|
|
| Auswechseln der Glühlampe |
6
|
Changing the Lightbulb |
6
|
|
| Spulen |
7
|
Bobbins |
7
|
|
| Einlegen der Spule in die Spulenkapsel |
8
|
Inserting the Bobbin |
8
|
|
| Einsetzen der Nadel |
9
|
Setting the Needle |
9
|
|
| Einfädeln des Oberfadens |
10
|
Upper Threading |
10
|
|
| Heraufziehen des Unterfadens |
11
|
Bringing Up the Bobbin Thread |
11
|
|
| Nähen |
12
|
Sewing |
12
|
|
| Sticheinstellung |
13
|
Adjusting the Stitch |
13
|
|
| Regelung der Geschwindigkeit |
13
|
Controlling the Speed |
13
|
|
| Die richtige Fadenspannung und ihre Regelung |
14
|
Regulating the Tension |
14
|
|
| Anwendung der Nähfüßchen |
15
|
Using the Presser Feet |
15
|
|
| Der normale Nähfuß |
15
|
The Normal Presser Foot |
15
|
|
| Der bewegliche Nähfuß |
16
|
The Hinged Presser Foot |
16
|
|
| Der Säumer |
17
|
The Hemmer |
17
|
|
| Der Kapper |
18
|
The Feller |
18
|
|
| Der Kantenfuß mit verstellbarem Wattierbügel |
19
|
The Quilter |
19
|
|
| Vorbereitung zum Stopfen |
20
|
Preparing to Darn |
20
|
|
| Stopfen |
21
|
Darning |
21
|
|
| Das Lineal |
22
|
The Seam Guide |
22
|
|
| Einkoffern |
23
|
Replacing in Case |
23
|
|
| Ratschläge |
24
|
Troubleshooting |
24
|
|
| Reinigung und Schmeirung |
28
|
Cleaning and Lubrication |
28
|
|
| Nadel- und Garntafel - Umschlagseite |
3
|
Needle and Thread Chart - inside cover |
3
|
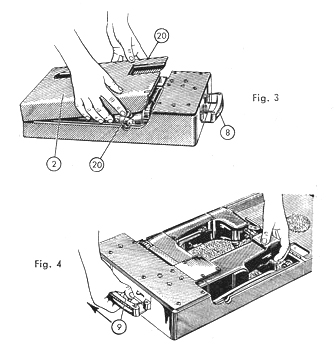
| Auskoffern der Nähmaschine | Removing Sewing Machine from Case | |
|
Zum Öffnen Koffer auf
den Tisch legen, Handgriff 8 nach rechts, Deckel 2 nach oben. |
Lay the case on the table with handle 8 to the right and lid 2 on top. Using both hands push both side buttons 20 at the same time and lift the lid (Fig. 3). Hold the handle in your right hand and with your thumb push the slide button 9 towards the front. Remove machine (Fig. 4). |
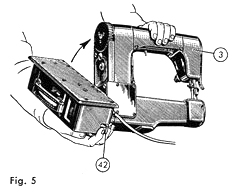
| Aufbau der Freiarmmaschine | Setting Up the Freearm | |
| Durch Drücken
auf den Rasthebel 42 Sperre lösen und Maschinenkörper 3 in Pfeilrichtung
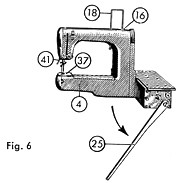
schwenken bis die Sperre wieder einrastet (Fig. 5). Garnrollenhalter 18 herauszeihen und bis zum Verschlußpilz 16 schwenken (Fig. 6). Kniehebel 25 nach unten drücken. |
Push on the rest lever 42. Release the latch and swing the machine body 3 in the direction of the arrow until the latch catches. (Fig 5). Pull out the spool pin 18 and swing around to the spool catch 16 (Fig. 6). Push the knee lever 25 down. |
 |
 |
| Umwandlung zur Tischmaschine | Converting to Table Machine | |
| Nadel durch Drehen
des Handrades 15 nach vorn in Hochstellung bringen, Nähfuß 39
mittels Lüfthebel 41 (in Fig. 6) anheben.
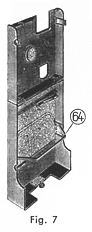
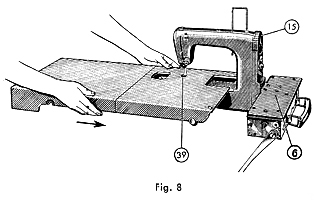
Den Koffer ganz aufklappen (Fig. 7), zwischen Nähfuß und Freiarm einschieben wie in Fig. 8 und in Rastung am Motorgehäuse 6 einsetzen. Die Stichplatte 37 (in Fig. 6) füllt in dieser Stellung die Öffnung des Koffers aus und schließt mit der Oberfläche des Koffers ab. Bei Bedarf Kofferstütze 64 herausklappen. |
Turn the balance wheel 15 toward you until the needle is at the highest position. Raise the presser foot 41. (Fig. 6). Completely unfold the case (Fig. 7). Slide it between the freearm and presser foot as in Fig. 8 and up against the motor housing 6. The throat plate 37 will line up with the opening in the case and will be even with the surface of the case. Unfold the case support 64. |
 |
 |
| Der elektrische Anschluß | Electrical Connection | |
| Es
ist darauf zu achten, daß die Maschine nur an ein Stromnetz Angeschlossen
wird, dessen Spannung und Stromart mit der Elektrik der Maschine im Einklang
stehen.
Spannung (Voltzahl) und Stromart (Gleich- oder Wechselstrom) des elektrischen Netzes sind auf dem Hauszähler vermerkt. Ist die Koffernähmaschine mit einem Wechselstromregelmotor ausgerüstet, kann sie nur für Wechselstrom verwandt werden. Durch einfache Umbrückungen an der Schaltleiste kann die Gerätespannung 220 oder 110 Volt geschaltet werden (Seite 5). Falls die Spannung geändert werden muß, dieses am besten einem Mechaniker oder Elektriker überlassen. Es ist darauf zu achten, daß auch die Glühlampe ausgewechselt wird (Seite 6). Bei eingebautem Allstrommotor kann die Maschine sowohl an ein Wechselstrom- als auch an ein Gleichstromnetz angeschlossen werden, aber nur für die vorgesehene Anschlußspannung von 110 oder 220 Volt. Ein Umschalten der Gerätespannung ist beim Allstrommotor nicht möglich. Die eingebaute Motorart und die vom Herstellerwerk geschaltete Spannung sind auf dem Garantieschein Vermerkt. |
Caution. It is important that this machine only be used with the correct electric voltage and current. Electric voltage and current (DC or AC) are marked on the household fuse or breaker box. If the sewing machine has an AC motor, it can only be used with AC current. The voltage can be easily changed to 220 or 110 (page 5). If the voltage needs to be changed to something else it is best to consult a mechanic or electrician. Also be aware that the lightbulb will need to be changed (page 6). If it has a built in all current
motor the machine can be used with AC or DC current, but only with 110
or 220 volts. Your warranty certificate will indicate which motor is on your machine. |
|
| Umschaltung der Gerätespannung | Switching the Electricals | |
| Achtung! Vorher
Gerätestecker aus der Steckdose ziehen!
Die sechs Befestigungsschrauben aus dem Motordekel 7 (in Fig. 1) herausschrauben und Motordeckel abnehmen. Bei Netzspannung 220 Volt Wechselstrom Schaltbrücken nach Fig. 9 einlegen. Bei Netzspannung 110 Volt Wechselstrom Schaltbrücken nach Fig. 10 einlegen. |
Caution! First unplug the motor from
the electrical outlet. Remove the six screws that are on the motor lid (Fig. 1) and remove lid. For 220 volt AC current follow Fig. 9. For 110 volt AC current follow Fig. 10. |

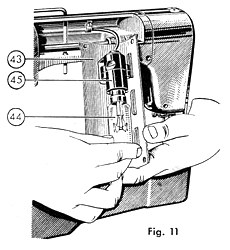
| Auswechseln der Glühlampe | Changing the Lightbulb | |
|
Mit dem Schraubenzieher die
vier Schrauben lösen, Reflektor 43 abheben, Glühlampe 44 in
die Fassung 45 drücken, nach links bis zum Anschlag drehen und herausnehmen
(Bajonettverbindung). Neue Glühlampe einschieben,
andrücken und nach rechts drehen bis zum Einrasten. Reflektor auflegen
und weider anschrauben. Es ist darauf zu achten, daß
die eingesetzte Glühlampe weder die Welle, noch die Reflektorwand
oder das Gehäuse berührt. |
With a screwdriver remove the four screws and lift off the reflector 43. Push the bulb 44 in the socket 45 and turn it to the left as far as it will go and remove (bayonet type). Push the new bulb into the socket and turn it to the right as far as it will go. Replace the reflector and the four screws. It is important that the bulb does not touch the shaft, the reflector wall nor the housing when in place. Uses tube bulb 25x85, 220 V (110 V0 25 W, BA 15 two polar DIN 49812. |