THE NEEDLEBAR
Online Manuals Section
I N S T R U C T I O N S
FOR THE USE OF
FRISTER AND ROSSMANN'S
Automatic Chainstitch
Sewing Machines
PART TWO
SETTING THE NEEDLE
The needle has a continuous groove running from the end of the eye, and the end of the Needle Bar has a corresponding mark upon which the groove fits and slides; the object is to ensure the Needle being properly placed, namely, with the groove always to the left; and any attempt to force in a Needle without a groove, or with the groove in the wrong direction, will result in
 |
 |
| Inserting or Taking Out the Needle |
Pushing Up the Needle
|
damaging the Needle Bar, and will prevent the Machine from working.
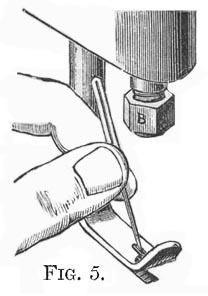
Let the Presser Foot down on the Cloth Plate by turning the Lifter to the right; raise the Needle Bar to its highest point by turning the
 |
|
Fastening the Needle
|
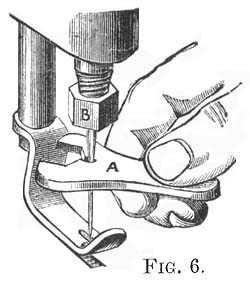
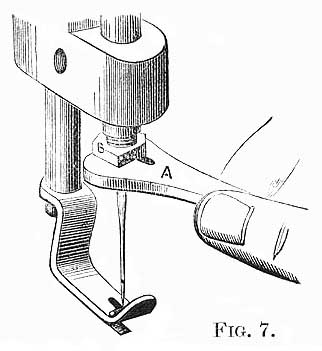
large wheel; then, holding the Needle between the thumb and first finger )Fig. 5) with the groove towards the left, insert the point of the Needle Hole in the Cloth Plate until the shank of the Needle is able to be inserted into the opening in the Needle Bar. Holding the Needle Wrench (A) provided (Fig. 7) between the right thumb and first finger, gradually turn the Needle Bar Nut (B) to the right, until the Needle is firmly bedded in its place.
Do not use a blunt needle; as it cannot do good work, and is liable to bend or break in going through the material. Never use a bent needle; it will cause dropped stitches and damage the Looper.
TO TAKE OUT THE NEEDLE
Let down the Presser Foot and raise the Needle Bar to its highest point. Unscrew the Needle Bar Nut with Needle Wrench, by making a quarter turn to the left.
TO TIGHTEN THE STRAP
When the Strap requires tightening, which it may do after the machine has been some time in use, proceed as follows:-
Take off the Strap, cut a small piece off one end, make a fresh hole, and again connect the ends by means of the hook.
TO THREAD THE MACHINE
The Threading of the Machine is shown in Fig.1.
In Threading, first pull out the Spool Pin, and place the Reel upon it. Replace Spool Pin. Raise the Needle Bar to its highest point, by turning large Wheel, and then proceed as follows:
1. Thread from the back toward you, through the two staples and hole in lever known as Pull-off (1, Fig.1). Pull through about six inches of thread. It facilitates threading to double and twist the end of the thread, it can be more readily passed through Pull-off and following places, when threading.
2. Then carry the thread between the Reel and Automatic Tension, drawing the thread into the slot under the cap of tension (2, Fig. 1).
3. Thread from right to left through the Thread Pin on top of the Frame (3, Fig.1).
4. Take the Thread from right to left through Wire Staple (4, Fig.1). Do not thread through loop of Spring under this Staple, unless embroidering.
5. Take the thread between thumb and finger of both hands, passing it between the Needle Bar and Take-up, and press it from you into the opening at the top of the Take-up (5, Fig.1)
6. Take the thread downwards through the Thread Pin (6, Fig.1).
7. Then through the Needle Eye from left to right (Fig.1).
TO REGULATE LENGTH OF STITCH TO SIZE OF THREAD OR SILK USED
|
Thread
|
Silk
|
Needle
|
Stitch
|
|
20
|
E
|
4
|
12
|
|
30
|
D
|
3
|
14
|
|
40
|
C
|
3
|
16
|
|
50
|
B
|
3
|
18
|
|
60
|
A
|
2
|
20
|
|
70
|
0
|
2
|
22
|
|
80
|
00
|
2
|
22
|
|
90
|
000
|
1
|
24
|
|
100
|
-
|
1
|
27
|
|
120
|
-
|
0
|
27
|
|
150
|
-
|
0
|
30
|
Sizes of Silk corresponding to those given in the Table stamped on Cloth Plate.
|
E silk equals No. 10
|
A silk equals No. 24.
|
|
D silk equals No. 12.
|
0 silk equals No. 30.
|
|
C silk equals No. 16.
|
00 silk equals No. 36.
|
|
B silk equals No. 20.
|
000 silk equals No. 40.
|
The above Table, corresponding to that stamped on the Cloth Plate of the Machine, shows the proper size of Needle and length of stitch for each size of cotton or silk. For example: For No. 70 cotton or 0 silk - equal to No. 30 silk - use a No. 2 needle, and 22 stitches to the inch. To the right of the Needle Plate is a slot, showing the number of stitches to an inch. To make the length of stitch required, move handle of Stitch Regulator until the proper number appears through the slot. The length of stitch indicated by the Table should always be used, as the proper elasticity will then be secured in all seams. A strict adherence to the Table will always ensure good and durable work.
SELECTING COTTON OR SILK
Cotton or silk for machine sewing may generally be three sizes finer than that used in hand sewing; as it is strong enough and better adapted to the work. For instance, where 40 cotton would be used in hand sewing, use 60 or 70 cotton on the Machine. The following rules on this subject may be useful:--
| No. | |
| For calico, long cloth, &c. ............... | Use Cotton 60 to 80 |
| For fine lawns, nainsooks, &c. ....... | Use Cotton 100 to 150 |
| For fine linens................................... | Use Cotton 80 to 120 |
| For light woolens, flannels, &c. ...... | Use Cotton 40 to 60 |
| For heavy woolens........................... | Use Cotton 20 to 40 |
| For dressmaking.............................. | Use Cotton 50 to 70 or Silk Nos. 24 or 30 (equal to A or O in the Table) |
| For hemming silk, &c. ..................... | Silk Nos. 36 (equal to OO in the Table) |
| For embroidery*............................... | Silk Nos. 8 to 10 (equal to F or E in the Table) |
| For braiding...................................... | Silk Nos. 30 (equal to O in the Table) or Cotton No. 70 |
Any good cotton works well on the Machine, except very fine numbers of soft finished. For black or coloured cottons use only glacé finished. Soft finished black and coloured cottons will often break or work unsatisfactorily. Use glacé cotton in place of linen thread.
Part One
| Part Three | Part
Four | Part Five